Let’s be honest—baking is a whole lot more fun when you’re not digging through a chaotic drawer to find a whisk or scraping around for your lost piping tips. An organized baking station doesn’t just look good—it saves time, reduces stress, and makes every baking session feel more intentional and enjoyable.
Whether you have an entire baking studio or just a corner cabinet for your supplies, organizing your tools thoughtfully can transform how you bake. In this guide, I’m walking you through everything from how to set up your baking space to smart, real-world solutions for storing even the trickiest items. Unlike many articles that throw out generic advice, this post focuses on practical, adaptable ideas that you can personalize based on your space, your workflow, and your baking habits.
Contents
- 1 Why a System Matters More Than Pretty Containers
- 2 Start With a Full Inventory—Yes, Every Single Item
- 3 Your Storage Should Match Your Workflow
- 4 Vertical Storage Is Your Secret Weapon
- 5 Don’t Just Use Containers—Use Them Intentionally
- 6 The Power of Labeling: A Small Step That Changes Everything
- 7 Designing a Space That Matches How You Bake
- 8 Pegboards and Wall Storage: Vertical Solutions That Make Sense
- 9 Smart Storage for Awkward Tools
- 10 Ingredient Storage: From Chaos to Control
- 11 Storing in Bulk Without Losing Your Mind
- 12 Rotating and Managing Seasonal Baking Tools
- 13 Maximize Awkward Spaces
- 14 Maintaining Your Baking Organization: It Doesn’t End After Setup
- 15 Make Resetting Part of Your Baking Routine
- 16 Sustainability: Organize Without Overbuying
- 17 Smart Habits That Support an Organized Space
- 18 Wrapping It All Up: Build a Space That Works for You
- 19 Quick-Reference Summary Table
- 20 Special Tips for Small-Space Bakers
- 21 Final Thoughts
Why a System Matters More Than Pretty Containers

Photo Credit: @becky.cunningham.home
You’ve probably seen those picture-perfect pantries on Instagram with matching jars and color-coded bins. They look nice, but here’s the truth: aesthetics alone won’t keep your space organized. A system, however, will.
When you build an organizing system based on how you actually bake—how often, what tools you use most, where you prefer to work—you create an environment that works with you, not against you. For example, there’s no point in storing your mixing bowls on a high shelf if you use them three times a week. Likewise, stashing your cake pans behind your blender just because it fits doesn’t make sense if you bake often.
Organization should support function first, then form. Once your system works, the beauty will follow.
Start With a Full Inventory—Yes, Every Single Item

Photo Credit: @denismedri
Before you can begin organizing your baking tools, take everything out and assess what you have. This part may feel tedious, but it’s absolutely essential. Over time, it’s easy to accumulate multiple versions of the same tool, ingredients that have long expired, or items that no longer serve your baking style.
Ask yourself: What do I actually use regularly? What tools only come out for specific holidays or projects? What items am I keeping out of habit but no longer need?
As you go through your tools, start grouping them by function. Not for storage yet, but for awareness. You’ll naturally start to see patterns—like how many mixing bowls you rely on, how many piping tips you’ve collected, or which tools never seem to have a proper place. This insight will inform how and where you store each category.
Your Storage Should Match Your Workflow

Photo Credit: @alittleofthisnthat
One of the biggest mistakes bakers make is mimicking someone else’s storage system without considering their own habits. The layout of your kitchen, how often you bake, and even your height or mobility will influence what works best for you.
Let’s say your stand mixer lives on your counter—then your flour, sugar, and measuring cups should live close by. If you decorate cakes often, keep piping bags, tips, and spatulas within arm’s reach of your prep station. On the other hand, tools you use rarely—like a donut pan or candy thermometer—can go into less accessible zones.
Instead of storing items by product type alone, consider where and when you use them. It’s all about reducing friction. The fewer steps it takes to access and return an item, the more likely your system will stick.
Vertical Storage Is Your Secret Weapon

Photo Credit: @melodyhilldesign
Flat storage takes up a lot of room. Vertical storage, on the other hand, can free up massive space and make tools easier to grab. If your pans, trays, and cake boards are stacked on top of each other, you’re not just wasting time pulling them out—you’re also risking scratches or dents.
Invest in a sturdy vertical pan organizer with adjustable dividers. It allows you to store items upright and side-by-side, giving you full visibility and access. You’ll instantly notice the difference during prep—no more lifting five trays just to grab the one you need.
But vertical space isn’t just for pans. Install wall-mounted pegboards or rail systems above your counter to hang spatulas, whisks, and rolling pins. Pegboards are especially helpful if you’re a visual organizer—seeing your tools laid out can make your baking flow much smoother.
Use the inside of cabinet doors too. A small rack can hold measuring spoons or silicone molds, while adhesive hooks can corral bag clips, oven mitts, or decorating scissors. These little touches add up to major convenience.
Don’t Just Use Containers—Use Them Intentionally
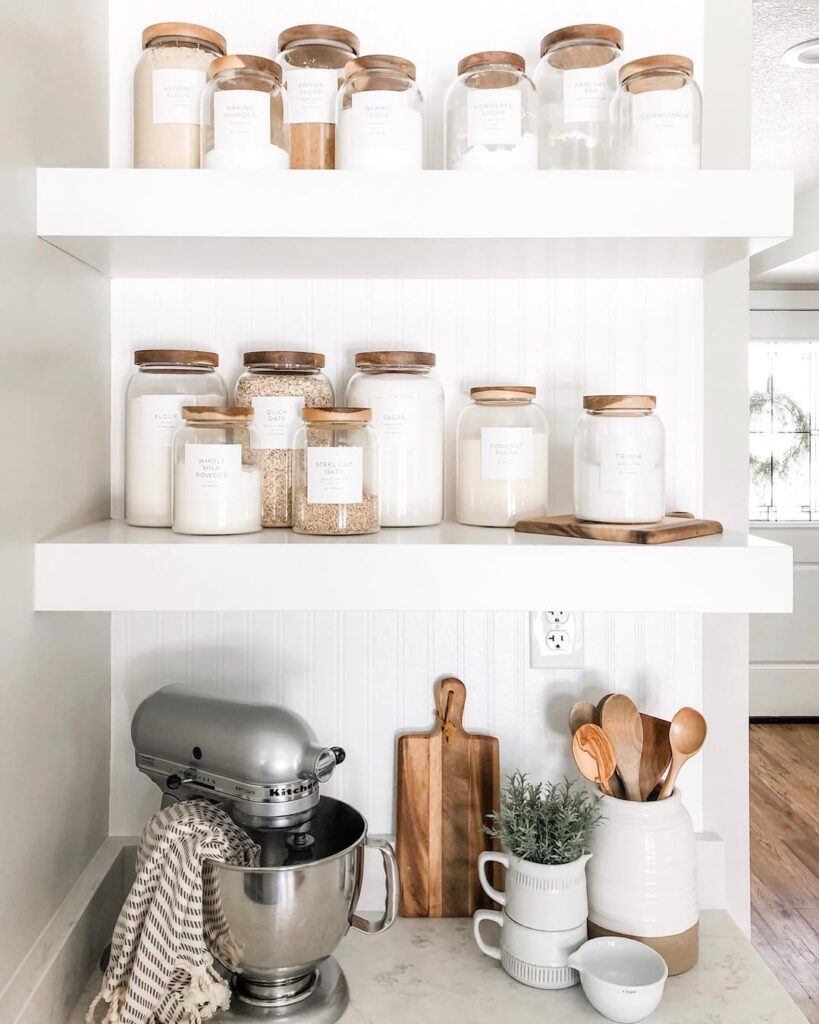
Photo Credit: @dwelingco
Containers are the backbone of any good baking organization system, but they’re not a one-size-fits-all solution. The key is matching the container to the type of item you’re storing.
Airtight, wide-mouthed canisters are perfect for storing dry ingredients like flour, sugar, or cocoa powder. These containers should be easy to open, scoop from, and stack. Avoid deep, narrow jars that require digging or make measuring awkward.
For smaller baking supplies—think cookie stamps, cupcake liners, or food coloring bottles—opt for shallow, stackable bins with dividers. Drawer organizers designed for office supplies actually work great for separating piping tips or mini cutters.
Just as important as the container itself is where it’s placed. Heavy jars shouldn’t sit on high shelves, and rarely used tools shouldn’t hog prime drawer space. Let functionality lead the way.
The Power of Labeling: A Small Step That Changes Everything
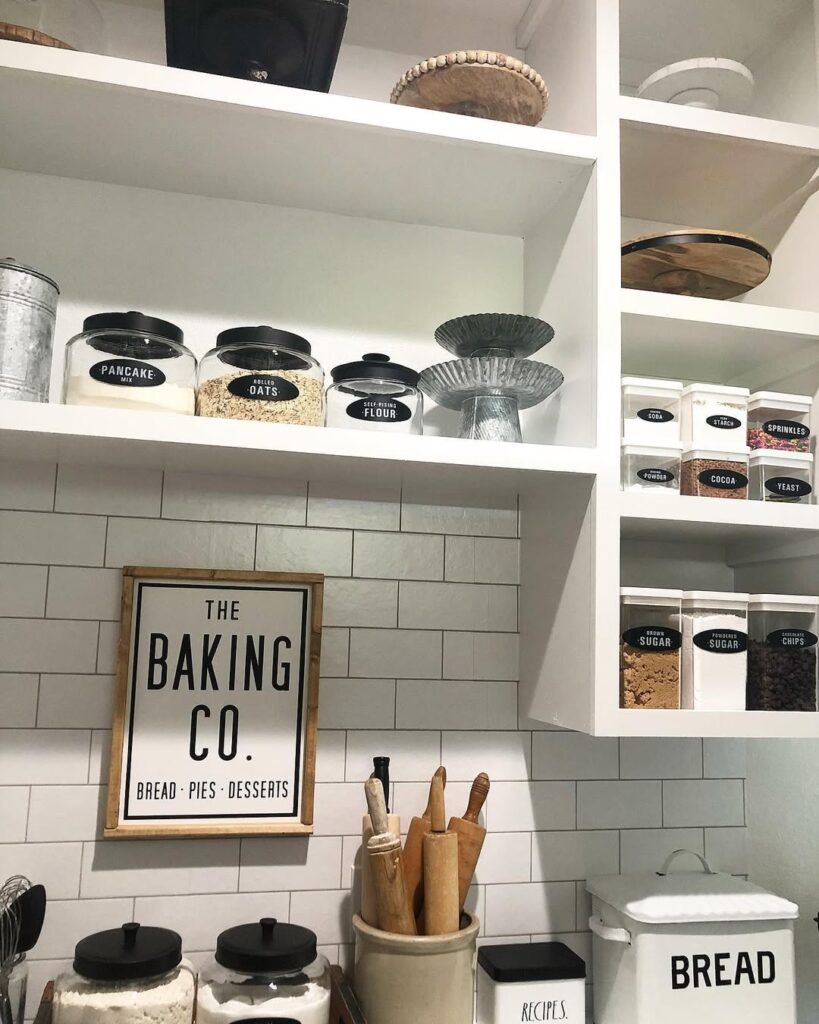
Photo Credit: @thecozyfarmhouse
One of the most underrated steps in any organizing system is proper labeling. It’s easy to overlook, especially when everything seems fresh in your mind. But over time, ingredients get swapped, containers change, and memory fades. A clear label saves you from kitchen disasters—like mixing up salt with sugar or using baking powder instead of cornstarch.
Labeling doesn’t have to be fancy or expensive. A basic label maker with refill tape works wonders for permanent storage. For temporary setups or DIY bins, washi tape and a fine-tip marker will do the job. Just make sure the label is legible, easy to read from a distance, and placed consistently on each container—ideally near the front or top.
Color-coded labels can be especially helpful if you’re organizing a wide range of tools. For example, pink labels for decorating items, green for dry ingredients, and blue for utensils. This visual coding makes it easier to scan your shelves and drawers without reading each label.
If you’re storing ingredients in containers, always include both the name and the expiration date. You can either write it directly or stick a small removable note on the bottom. This small habit prevents waste and encourages regular rotation of supplies.
Designing a Space That Matches How You Bake
Photo Credit: @athomewithgynna
The best-organized kitchens aren’t just tidy—they’re efficient. They reflect the habits of the person who uses them. If you’re someone who bakes often, your tools need to live close to your primary work zone. If you bake occasionally, you may want a modular system you can tuck away when not in use.
Start by identifying your baking “hot spots.” This might be your stand mixer station, a prep counter, or the oven zone. Once you know where you do most of your work, arrange your tools around that zone like spokes on a wheel.
For example, store your measuring spoons, cups, and mixing bowls in the drawer or cabinet just below your prep surface. Keep your flours, sugars, and leavening agents in a nearby pantry basket or cabinet bin. Decorating tools like piping bags and tips should go in a shallow drawer or labeled container within arm’s reach of your decorating station.
Think about the order in which you use items and set them up to match your baking rhythm. That way, you can grab what you need, when you need it—without losing momentum.
If your baking space shares duties with regular cooking, consider using portable caddies or bins. A labeled “baking bin” that you can pull out when it’s time to bake and stash away when you’re done keeps tools together without cluttering your day-to-day setup.
Pegboards and Wall Storage: Vertical Solutions That Make Sense

Photo Credit: @giromorganiza
Wall-mounted storage isn’t just trendy—it’s highly functional, especially in smaller kitchens where drawer and cabinet space is limited. A pegboard offers an excellent way to display and organize tools like spatulas, whisks, and even cookie cutters. It turns your wall into a flexible workspace that adapts as your collection grows.
Mount your pegboard near your prep counter and arrange tools by size or category. Use small baskets or hooks to hold lighter items, and keep often-used tools like offset spatulas or rolling pins in the center for easy access. Over time, you’ll find yourself naturally reaching for the same spots, making your baking flow more intuitive.
Another great use of wall space is magnetic strips. These are especially helpful for holding metal cookie cutters or small tools like tweezers and scissors used in cake decorating. If you’re short on wall space, consider the insides of cabinet doors. Adhesive hooks or slim organizers can turn otherwise wasted space into practical storage zones.
Smart Storage for Awkward Tools
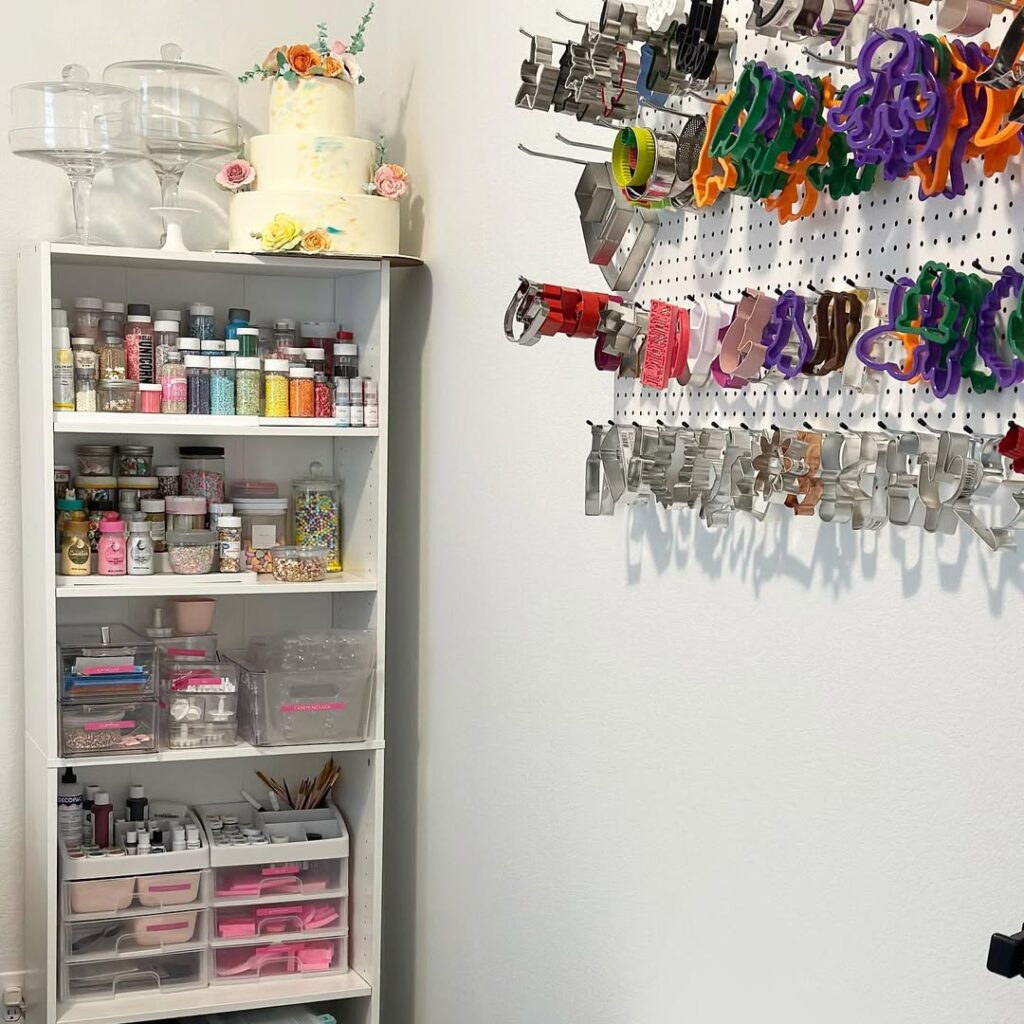
Photo Credit: @deliciousnessbakery
Some baking tools simply don’t play nice when it comes to storage. Piping tips, cookie cutters, and silicone molds are famously annoying to keep in order. But with a little creativity, even these items can be tamed.
Let’s start with piping tips. These tiny tools can get lost easily and are a pain to dig through when you’re mid-project. Rather than tossing them in a bin, use a compartmentalized bead or craft organizer. These shallow boxes have individual slots that keep tips separated by size or type, and they usually come with lids to keep everything clean.
For cookie cutters, especially if you have a large collection, stackable plastic folders or small open-top boxes work well. Organize them by shape or holiday theme and label each box clearly. Avoid dumping them all into one container—it’s a recipe for frustration. If you’re a frequent cookie baker, wall-mounted racks or hanging clips can also display and store cutters efficiently.
Silicone molds, being floppy and oddly shaped, are another challenge. Try storing them in a magazine file holder or laying them flat in a wide drawer. You can also roll them gently and secure with a loose band to save space without damaging the mold.
Ingredient Storage: From Chaos to Control
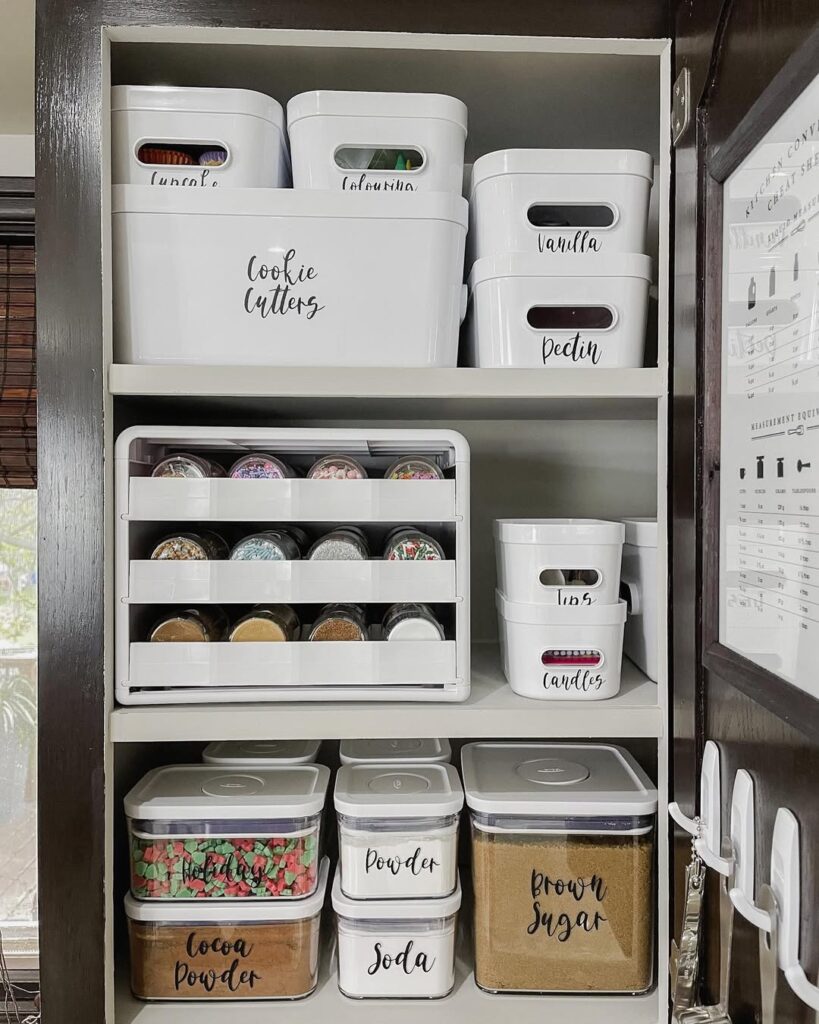
Photo Credit: @thecontainerstore
When it comes to baking, ingredients take up more room than we expect—especially when you buy in bulk or use a wide range of specialty items. Without a clear system, flour bags, half-used sugar packets, and jars of sprinkles can quickly pile into a disorganized mess.
The first rule of ingredient storage? Get rid of the original packaging.
Store dry goods like flour, powdered sugar, and cocoa powder in airtight containers that are easy to scoop from. Choose containers with wide openings and flat tops so they can stack neatly. Clear plastic or glass containers let you see what’s inside at a glance, which is helpful for quick prep and inventory checks.
Avoid mixing similar-looking powders in unlabeled jars—many disasters have started that way. Make labeling a habit, and don’t forget to include the expiration or purchase date. If you bake often, you can add small measuring scoops directly into the containers to save time during prep.
For ingredients like chocolate chips, coconut, nuts, or baking soda, consider organizing by size and frequency of use. Place everyday items in an easy-access drawer or shelf bin, and store less commonly used products in higher cabinets or pull-out pantry baskets.
Keep spices and flavor extracts together in a caddy or lazy Susan. This keeps everything compact and visible. A tiered shelf inside your cabinet can also help you avoid the dreaded “three bottles of vanilla extract” situation.
Storing in Bulk Without Losing Your Mind

Photo Credit: @simplespaces_organizingco
Buying ingredients in bulk is cost-effective, but only if you know how to store them well. Otherwise, you risk stale flour, lost items, and wasted space.
For bulk storage, set up a two-tier system. Use large, airtight containers to hold the main stock (often stored in the pantry, a closet, or utility cabinet), and smaller refill containers in your baking zone. That way, your everyday area stays tidy, and you don’t need to wrestle with a 5-kilo flour sack each time you bake.
Bins with wheels or slide-out bins at the bottom of your pantry are great for housing large amounts of flour, sugar, or oats. If you have deep drawers, these can also serve as hidden storage for backup supplies.
Don’t forget temperature and humidity control. Ingredients like chocolate, yeast, and nuts can go bad quickly if not stored properly. Keep sensitive items in cool, dry spaces—avoid cabinets near the stove or dishwasher. For tropical climates, consider food-safe desiccant packs or even refrigeration for certain items.
Rotating and Managing Seasonal Baking Tools

Photo Credit: @breathing.room.home
Let’s face it—most of us have baking supplies that only come out during the holidays. Cookie cutter sets, themed molds, festive sprinkles, even specific cake toppers. Instead of letting these rarely used items take up precious drawer or cabinet space all year long, set up a rotating system.
Designate a seasonal bin that lives in a higher cabinet or an out-of-the-way shelf. Label it clearly—something like “Holiday Baking Tools”—and store everything related to specific occasions in that container. When the season rolls around, simply swap out items from your daily-use drawers or shelves with your seasonal tools.
This rotating strategy not only keeps your space clutter-free but also makes holiday baking feel like an exciting event. Everything is together, pre-sorted, and ready to go.
You can take it one step further by organizing seasonal items by category within the bin using smaller containers or pouches. This way, Halloween cookie stamps don’t get tangled up with Christmas molds or Valentine’s Day sprinkles.
For those who bake for different holidays or events throughout the year, consider a set of color-coded containers—each representing a season. It’s a small touch that brings huge clarity.
Maximize Awkward Spaces

Photo Credit: @mirandaporterdesign
Even the smallest kitchens have hidden organizing opportunities. The trick is knowing how to spot and use them. Spaces like the sides of cabinets, the tops of shelves, or narrow gaps between appliances can become functional when paired with the right tools.
Install tension rods vertically inside deep cabinets to create dividers for trays or cutting boards. Use risers to double stack small containers in a pantry or closet. Slim rolling carts can slip into gaps between your fridge and counter, storing extra tools, parchment paper, or bulk goods.
Don’t overlook under-cabinet storage either. Magnetic strips for metal tools, small hooks for hanging measuring cups, or even a mounted basket for parchment paper rolls can make a big difference in how accessible your tools feel.
These creative solutions help free up space in drawers and give awkward nooks a useful purpose.
Maintaining Your Baking Organization: It Doesn’t End After Setup

Photo Credit: @simplyorganized
Setting up an organized baking system is just the beginning. The real success lies in how well you maintain it. Many beautifully arranged kitchens slowly slide back into chaos simply because the system wasn’t built for real life—or because small daily habits weren’t put in place to keep it running smoothly.
The first rule of maintenance is everything should have a home. If a tool or ingredient doesn’t have a designated spot, it will inevitably be left out or misplaced. Make it easy for yourself to return items where they belong by ensuring those homes are intuitive, reachable, and labeled.
Another key principle is to clean as you go. During busy baking sessions, the temptation to toss tools aside and keep moving is strong—but taking just a few seconds to rinse a spatula or return a mixing bowl to its spot can prevent overwhelming post-bake messes.
It also helps to schedule quick weekly check-ins. Take five minutes once a week to wipe down your most-used areas, reorganize anything that’s been misplaced, and scan ingredient labels for freshness. This tiny habit pays off big in the long run—preventing deep cleans and ingredient waste.
Make Resetting Part of Your Baking Routine
Just like you might preheat the oven or measure out ingredients, resetting your baking station should become a routine. Once your bake is done and your treats are cooling, take a few minutes to reset the space.
This doesn’t mean a full cleanup—it simply means returning tools to their homes, re-stocking containers if needed, and clearing the counters. Think of it as “closing down” your baking workspace so that next time you bake, everything is ready to go.
If you’re someone who bakes multiple times a week, keep a reset basket nearby. As you work, toss used tools or containers into the basket. Once you’re done, sort and clean everything at once rather than backtracking across the kitchen.
Many professional kitchens follow this idea closely—it’s part of how chefs maintain efficiency. The cleaner and more reset your space is between sessions, the faster you can dive back into the creative process without delays.
Sustainability: Organize Without Overbuying
With organizing content everywhere these days, it’s easy to fall into the trap of thinking you need to buy more stuff to be organized. But in reality, most home bakers can set up a highly functional system using what they already own.
Before purchasing anything new, shop your home. Can a craft organizer become your piping tip storage? Can an unused bookshelf become your baking pantry? Can leftover takeout containers become your ingredient holders?
If you do need to invest in storage, choose items that are versatile, stackable, and durable. Avoid gimmicky one-purpose organizers—they rarely offer long-term flexibility. The best systems are modular and grow with your baking needs.
Also consider sustainable materials when possible. Glass jars, bamboo racks, and metal bins are not only durable, they’re eco-friendly alternatives to disposable plastic.
And if you’re upgrading your system, don’t toss the old organizers—repurpose them elsewhere in your kitchen or share them with fellow bakers.
Smart Habits That Support an Organized Space
Organization isn’t just about what you buy—it’s about how you behave. A few consistent habits can keep your setup functioning long after the initial excitement fades.
- Restock before you run out. Keep an eye on staple ingredients like flour, sugar, baking powder, and butter. Running out mid-bake creates unnecessary stress.
- Declutter regularly. Baking trends change, tools break, and preferences evolve. Every few months, reassess what you use and let go of what you don’t.
- Use labels that last. Invest in waterproof or oil-resistant label tape if you store oily ingredients or containers that are regularly washed.
- Zone your tools. Keep items grouped by task (e.g., decorating, mixing, measuring). It saves time and prevents drawer clutter.
- Don’t overstuff. Leave room for air and movement in drawers and containers. Cramming tools together makes them harder to retrieve—and return.
Consistency is what makes organization sustainable. If you get into the habit of resetting, decluttering, and planning your space around your flow, your kitchen will stay functional with minimal effort.
Wrapping It All Up: Build a Space That Works for You
Baking is as much about creativity and joy as it is about precision and preparation. When your tools are organized and your ingredients are within reach, your kitchen becomes a place of calm and inspiration—not chaos. The right organization system doesn’t have to be complex, expensive, or Pinterest-perfect. It just has to work for you.
The goal is not to copy someone else’s setup but to build one that fits your space, tools, and habits. Every drawer you open without digging, every ingredient you grab without a spill, every tool you return without effort—that’s when you know your system is doing its job.
If you’re just starting, don’t feel overwhelmed. Begin with what you use most often, create homes for those essentials, and build from there. And if you’re already halfway organized, look for the weak spots. A single tweak—like adding a divider or hanging a rack—can make a huge difference.
Quick-Reference Summary Table
Here’s a simple table to help you remember what goes where, and how best to store different types of baking tools and supplies:
| Item Type | Best Storage Method | Location Tip |
|---|---|---|
| Flour, Sugar, Cocoa | Airtight, stackable containers | Near stand mixer |
| Measuring Tools | Drawer with dividers | Directly under prep counter |
| Baking Pans & Trays | Vertical organizer rack | Lower cabinet or pull-out shelf |
| Piping Tips | Compartmentalized craft box | Labeled, shallow drawer |
| Cookie Cutters | Themed boxes or hanging hooks | Seasonal bin or drawer |
| Decorating Tools | Pegboard or magnetic rack | Near decorating zone |
| Spices & Extracts | Lazy Susan or tiered shelf | Cool, dry cabinet |
| Seasonal Tools | Labeled bin for rotation | Top shelf or infrequently used area |
| Silicone Molds | Magazine holders or flat drawers | Avoid folding to preserve shape |
Special Tips for Small-Space Bakers

Photo Credit: @laurasbakery
Working with a tiny kitchen or limited countertop space? You’re not alone. Many passionate bakers make do with studio apartments, shared kitchens, or even converted closets. Here are a few tricks to make the most of every inch:
- Think vertical. Use walls, cabinet sides, or fridge gaps to hang or mount tools.
- Use rolling carts. A compact baking cart can hold your essentials and be tucked away when not in use.
- Divide deep drawers. Shallow inserts or risers prevent everything from piling up.
- Under-shelf baskets. These slide onto existing shelves and add hidden tiers.
- Keep it mobile. Use portable bins or baskets to create a baking “kit” that can be pulled out as needed.
Small spaces demand smarter systems, but they can be just as efficient and joyful with the right layout.
Final Thoughts
Organizing your baking tools is one of the best investments you can make in your kitchen—second only to a reliable oven. When you take time to build a system that aligns with your baking rhythm, your entire process becomes smoother, more satisfying, and yes, even more fun.
Whether you’re storing pans, whipping up cookies, or piping your dream cake, the key is preparation—and a space that supports your creativity. Now, it’s your turn. Open that drawer, take stock of your tools, and give your baking setup the upgrade it deserves.
Happy baking—and even happier organizing!