Welcoming a new baby into the family changes everything—including how your kitchen works. Suddenly, you’re juggling bottles, formula, sterilizers, pump parts, tiny utensils, and more. Without a solid organization system, your kitchen can quickly become overwhelmed.
Whether you’re preparing for your baby’s arrival or trying to restore order after they’re here, this guide will walk you through practical, smart, and adaptable solutions to streamline your kitchen. From baby-safe zones to efficient storage, we’ve got every inch covered so you can stress less and focus more on your little one.
Contents
- 1 Why Baby Kitchen Organization Matters?
- 2 Definition List: Key Baby Kitchen Terms
- 3 How to Set Up a Baby-Friendly Kitchen (Step-by-Step)
- 4 3. Prioritize Accessibility: What to Keep Low vs. High
- 5 4. Create a Feeding Prep Station
- 6 5. Make the Freezer Baby-Ready
- 7 6. Transition-Ready Zones: Planning for Baby’s Growth
- 8 7. Child-Friendly Zones: Encouraging Independence
- 9 8. Smart Use of Vertical Space
- 10 9. Labeling & Categorization: Keep It Functional
- 11 10. Cleaning & Sterilization Station
- 12 12. Streamline Reordering with an Inventory System
- 13 13. Safety First: Baby-Proofing the Kitchen
- 14 14. Travel-Ready Baby Essentials Storage
- 15 15. Sustainable Baby Kitchen Practices
- 16 Summary: Build a Calm, Clutter-Free, Baby-Ready Kitchen
Why Baby Kitchen Organization Matters?
Organizing your kitchen for baby isn’t just about tidiness—it’s about saving time, ensuring safety, and reducing stress during one of life’s most demanding transitions.
Benefits of a Baby-Ready Kitchen:
- Efficiency: Everything is easy to find, even during a 3 a.m. bottle run.
- Cleanliness: Clear zones reduce cross-contamination between baby and adult food/tools.
- Independence: As your baby grows, a thoughtful setup encourages early self-reliance.
- Safety: Items like glass bottles, medications, and sharp tools are stored safely out of reach.
Before diving into tips and tools, let’s clarify some commonly used terms in baby kitchen setups.
Definition List: Key Baby Kitchen Terms
Sterilizer:
A device (often electric or microwave-safe) used to sanitize bottles and feeding tools.
Drying Rack:
A designated rack (often with pegs and trays) to air-dry baby bottles and accessories hygienically.
Feeding Essentials:
Includes bottles, nipples, formula dispensers, breast pump parts, sippy cups, baby spoons, bowls, and plates.
Baby Drawer or Zone:
A dedicated kitchen space that stores all baby-related items for easy access and safety.
Clear Storage Bins:
Transparent containers that help visually organize small baby items, often used in cabinets or drawers.
How to Set Up a Baby-Friendly Kitchen (Step-by-Step)
1. Designate a Baby Station

Photo Credit: @sorttossrepeat
Create a specific area in your kitchen just for baby items. Think of this as your new “baby bar.” This zone could be a set of drawers, a cabinet, or a dedicated countertop space.
Key features to include:
- A small drying rack
- Sterilizer or bottle warmer
- Space for bottles and nipples
- Daily feeding essentials
Tip: Position it near your sink for easy cleanup and refills.
2. Choose Clear Bins for Visibility
One area where competitor articles lacked depth is clear categorization of what goes where. Don’t just toss everything in a drawer. Use clear labeled bins to break items down by function:
- Bottles and nipples
- Sterilized parts
- Frozen milk bags
- Solid food supplies (for later)
| Category | Storage Tool | Location |
| Bottles & nipples | Clear bin with lid | Lower cabinet |
| Pump parts | Divider tray | Top drawer |
| Formula containers | Acrylic bin | Near prep area |
| Baby food jars | Stackable containers | Pantry section |
Bonus Tip: Label each bin using waterproof, wipeable stickers. This helps everyone in your household know where things go—no more hunting.
3. Prioritize Accessibility: What to Keep Low vs. High
One of the most overlooked parts in competitor posts is how to set up storage based on frequency and safety. Accessibility matters—especially during busy feeding times or when holding a baby in one arm.
Store Low:
- Daily-use bottles
- Pump parts
- Formula, bibs, and burp cloths
- Baby utensils and dishes (once solids start)
Why? These items are used multiple times a day and need to be within arm’s reach—ideally in the lower drawers or front-row cabinet space.
Store High:
- Backup bottles
- Extra pump parts
- Larger containers of formula or breast milk storage bags
- Unused baby dishes or tools for later months
Why? These are for rotation or storage—not daily use—so they can be tucked away in higher shelves or the back of deeper drawers.
Safety Tip:
Avoid storing glass bottles or heavy containers in overhead spaces. They pose a drop risk when you’re rushing or multitasking.
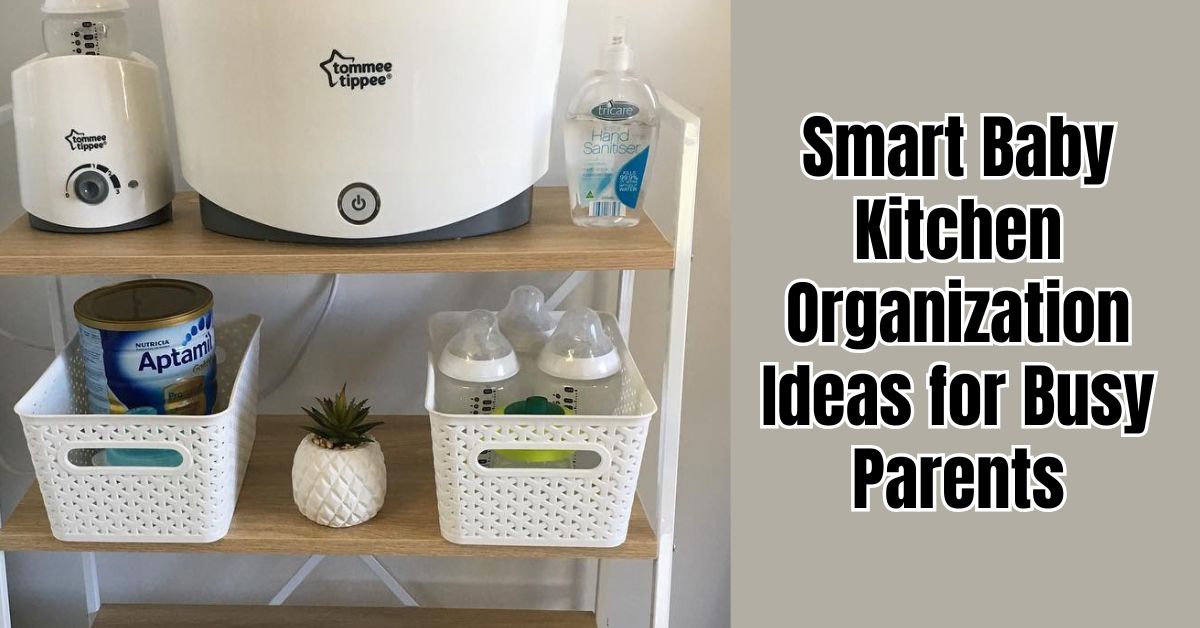
4. Create a Feeding Prep Station

Photo Credit: @baby.bunting
This is where your baby bar becomes a feeding command center. Ideally, it’s a combination of storage and countertop space where you can prep bottles, mix formula, and wash accessories with ease.
Must-Have Items:
- Bottle warmer or hot water kettle
- Sterilizer
- Space-saving drying rack (e.g., Boon Grass or OXO Tot)
- A clean, wipeable mat or tray for drying
- Formula scoop and measuring tools
Pro Tip: Use a compact turntable (lazy Susan) inside a cabinet or on a shelf to hold smaller items like pacifiers, pump valves, and medicine droppers. It keeps items visible and reduces clutter.
Nighttime Bottle Station Hack:
Keep a compact caddy in your bedroom or hallway with:
- A few pre-filled bottles (formula or breast milk)
- Clean nipples in a covered container
- A thermos of warm water (for mixing)
- Small towel or wipes
This simple setup cuts down kitchen trips during night feeds!
5. Make the Freezer Baby-Ready
Your freezer plays a critical role—especially if you’re storing breast milk or prepping baby food in batches. Yet competitor content barely skims this essential area.
Freezer Organization Tips:
- Use flat breast milk bags to save space (lay them flat until frozen, then stand upright in bins).
- Label bags with the date using waterproof markers.
- Dedicate one bin for frozen breast milk and another for frozen purees (once baby starts solids).
| Freezer Zone | What to Store | Tool |
| Top shelf (easy reach) | Daily-use milk or food portions | Stackable freezer trays |
| Lower shelf or door bin | Long-term storage (milk, purees) | Deep freezer bins |
| Side rack (if any) | Teethers or medicine (if freezer safe) | Mini baskets |
6. Transition-Ready Zones: Planning for Baby’s Growth

Photo Credit: @sorttossrepeat
Your baby’s kitchen needs will evolve rapidly. Planning for that now can save you multiple reorganization sessions down the road.
What to Do Now:
Reserve a mid-height shelf or drawer for future items like:
- Suction bowls
- Toddler plates.
- Sippy cups and training utensils
Keep these grouped in a labeled bin or tote so they’re easy to pull out when needed. Store unused baby items together and clearly labeled to prevent duplicates or forgetfulness.
When Baby Starts Solids:
Set up a solids station near your feeding zone with:
- Baby food jars or homemade puree containers
- A highchair-friendly placemat
- Bibs and baby wipes
- Food scissors (for soft-cutting)
Pro Tip: Use a drawer divider or bin labeled “meal prep” to store these items together. Pull it out during meal times and put it away when done—no mess left behind!
7. Child-Friendly Zones: Encouraging Independence

Photo Credit: @sorttossrepeat
As your baby transitions into toddlerhood, build a kitchen space that encourages safe, age-appropriate independence.
Set Up a “Toddler Drawer”:
Designate one low drawer or shelf with:
- Plastic bowls and plates
- Sippy cups or straw bottles
- Snack containers or silicone pouches
This helps your child:
- Learn self-feeding routines
- Participate in setting the table
- Develop decision-making and coordination skills
Pantry Snack Station (Toddler Version):

Photo Credit: @kalejunkie
Create a reachable bin with:
- Pre-portioned dry snacks (puffs, crackers)
- Toddler bars
- Small water bottles or juice boxes
Use labeled, open bins or baskets so your child can help themselves—with your guidance.
Fridge Tip:
Use a lower fridge drawer or bin labeled with:
- Yogurts
- Fruit slices in snack containers
- Cheese sticks
This can become your toddler’s go-to fridge spot, keeping snack time structured yet accessible.
8. Smart Use of Vertical Space
A significant gap in competitor content was utilizing vertical space, especially for small kitchens or apartments.
Here’s how to optimize it:
Wall-mounted Solutions:
- Use an over-the-door organizer for lightweight baby gear like bibs, pump parts, and cleaning cloths.
- Hang hooks under cabinets for bibs or cleaning tools.
- Magnetic fridge caddies or command strips for lightweight essentials like feeding charts or emergency items.
Shelf Risers:
These double the storage inside cabinets—perfect for stacking baby dishes and containers without clutter.
| Vertical Tool | Best Use | Where to Install |
| Wall-mounted shelves | Baby books, bottles, pump parts | Near feeding prep zone |
| Under-shelf baskets | Bibs, placemats, flat utensils | Inside pantry or drawers |
| Cabinet risers | Formula cans, baby food jars | Inside cabinets |
Tip: Always secure heavier items and avoid placing breakables or unsafe tools above eye level.
9. Labeling & Categorization: Keep It Functional

Photo Credit: @organizing.augusta
A well-organized baby kitchen isn’t just about placing items—it’s about maintaining it easily, even on the busiest days.
Why Labeling Matters:
- Ensures anyone (partner, nanny, grandparent) can find or put away baby items correctly
- Reduces clutter caused by misplaced items
- Helps with restocking and rotating supplies
Label Ideas:
- “Daily Bottles”
- “Sterilized Pump Parts”
- “Ready-to-Use Milk”
- “Solids – Stage 1”
- “Backup Supplies”
- “Snacks (Toddler)”
Use waterproof, wipeable labels or clear label tape on bins and drawers. For a cleaner look, consider minimalist printed labels in a matching font.
10. Cleaning & Sterilization Station

Photo Credit: @kirsty_slates
This is another area glossed over by your competitors, yet it’s essential to baby kitchen hygiene.
Essentials for a Dedicated Cleaning Zone:
- A collapsible tub for washing bottles separately
- Soft-bristled bottle brushes (ideally one for nipples and one for bottles)
- A sterilizer (microwave or electric)
- Dishwasher basket for small parts (valves, pacifiers, sippy cup lids)
Store cleaning tools near your sink or under it in labeled bins. If you’re using shared sink space, keep these items in a portable cleaning caddy.
Quick-Dry Tip:
Use a vertical drying rack with prongs to maximize space and allow air flow. Opt for countertop corner racks to keep your space efficient.
| Cleaning Tool | Best For |
| Silicone drying mat | Bottles, cups, pump parts |
| Boon Grass/Lawn rack | Drying multiple bottle parts quickly |
| Dishwasher basket | Safely washing tiny parts |
| Microwave sterilizer bag | Quick sterilization during travel |
12. Streamline Reordering with an Inventory System
One of the biggest frustrations for parents is running out of baby essentials. Yet none of your competitors touched on the importance of maintaining a baby kitchen inventory system.
Simple Inventory Hacks:
Keep a small whiteboard or magnetic pad on your fridge labeled “Low On” to jot down when you’re almost out of:
- Formula
- Breast milk storage bags
- Baby spoons or bibs
- Diaper cream (often stored in kitchen near feeding stations)
- Use color-coded bins or labels to mark “Backups” vs. “Daily Use.”
Consider apps like Trello, Cozi, or Google Keep to track kitchen supplies and feeding essentials digitally if you prefer mobile reminders.
13. Safety First: Baby-Proofing the Kitchen

Photo Credit: @twomums.uk
As your baby grows and starts crawling or cruising, safety becomes a top priority in any kitchen setup.
Must-Have Baby-Proofing Tools:
- Cabinet locks: Especially important if you store bottles, cleaning supplies, or pump parts under the sink or in lower cabinets.
- Drawer latches: Keep utensils and snack items secure.
- Corner guards: Use them on kitchen counters or storage carts.
- Stove knob covers: If your kitchen is open or if baby plays near while you cook.
Bonus Tip:
Dedicate one safe, easily accessible drawer for your baby to explore safely—filled with plastic bowls, soft spoons, and rattles. This encourages curiosity in a safe way while you’re in the kitchen.
14. Travel-Ready Baby Essentials Storage

Photo Credit: @babystation_vending
Your competitors completely overlooked the on-the-go side of kitchen prep for babies. A portable kit is essential.
Create a “Grab & Go” Baby Feeding Kit:
Keep a tote or caddy stocked with:
- Travel formula containers or pre-measured powder
- Collapsible bottles or water pouches
- Baby spoons and a silicone placemat
- Sanitizing wipes
- A clean bib and burp cloth
Store it in a small kitchen cabinet near your daily feeding station so it’s always ready to refill or take.
15. Sustainable Baby Kitchen Practices
Modern parents often seek eco-conscious solutions—another missed opportunity in competitor content.
Eco-Friendly Baby Kitchen Tips:
- Use glass baby bottles or BPA-free reusable containers
- Invest in reusable silicone food pouches for homemade purees and snacks
- Switch to cloth bibs and reusable wipes
- Choose bamboo baby utensils instead of plastic
This not only reduces waste but helps you save money in the long run.
Summary: Build a Calm, Clutter-Free, Baby-Ready Kitchen
Let’s recap the key elements to transform your kitchen into a functional, organized, and baby-friendly space:
- Designate clear zones for feeding, cleaning, and baby-safe storage
- Invest in bins, dividers, and labels to streamline access and reduce clutter
- Plan ahead for transitions like solids, toddler independence, and future needs
- Add safety features and create on-the-go kits for flexibility
- Practice sustainable organization to reduce waste and support eco-values
An organized baby kitchen doesn’t just save time—it brings calm to your daily routine and creates a space where your growing child can thrive.