
Have you ever stepped into your RV only to feel the entire rig shake, wobble, or sway beneath your feet? You’re not alone. Many RV owners, from weekend warriors to full-time travelers, deal with this frustrating issue. Whether it’s your partner walking inside, your pet jumping on the couch, or wind gusts nudging your camper, the problem is the same: an unstable RV.
Thankfully, there’s a solution. In this guide, I’ll walk you through 15 smart RV stabilizer ideas to stop your rig from rocking and make your setup feel solid and secure—no matter where you’re parked. I am not just recycling the same product list you’ve seen everywhere else. I’ve carefully analyzed what’s missing from other resources and packed this article with overlooked tools, practical insights, and setup strategies that actually work in the real world.
Contents
- 1 Understanding RV Rocking: Why Does It Happen?
- 2 Stabilizing vs. Leveling: What’s the Difference?
- 3 Why Proper Stabilization Matters More Than You Think
- 4 Foundation First: Getting Your RV Perfectly Level
- 5 1. Use Heavy-Duty Scissor Jacks for All-Corner Stability
- 6 2. Add a Center Stabilizer Bar to Cut Frame Flex
- 7 3. Stabilize the Tongue Jack with a Tripod or Block Base
- 8 4. Don’t Forget the Rear Bumper Area
- 9 5. Always Use Wheel Chocks—But Upgrade to X-Chocks for Maximum Hold
Understanding RV Rocking: Why Does It Happen?
To truly fix the problem, you first need to understand what causes it. RV rocking happens because the vehicle’s structure rests on flexible components—wheels, tires, springs, and jacks. These parts are designed to absorb motion on the road but can work against you when parked. Combine that with interior movement, unbalanced weight distribution, and sometimes uneven ground, and you end up with that all-too-familiar swaying sensation.
Rocking is not just an annoyance—it can be a safety issue. If your RV isn’t stable, entering and exiting can become dangerous. It can also cause doors to shift, furniture to creak, and appliances like refrigerators to malfunction if the rig is not properly level. Over time, excessive movement can even lead to structural wear.
Stabilizing vs. Leveling: What’s the Difference?

Photo Credit: @kentuckycampground
Here’s where many new RVers make a critical mistake: they confuse stabilizing with leveling. These two steps serve very different purposes, and getting them in the wrong order can damage your RV.
Leveling is the first step in any good setup. It involves adjusting your RV so it sits evenly from side to side and front to back. This is essential for safety, appliance operation, and comfort. You’ll typically use leveling blocks under your tires and adjust the tongue jack or leveling system to achieve a level frame.
Once your RV is level, it’s time to stabilize. Stabilization is all about reducing movement. Even a perfectly level RV can feel like a trampoline if it doesn’t have proper stabilizer systems in place. Stabilizers absorb and distribute weight across key contact points to prevent bounce, sway, and rocking when you move inside the RV.
The most important rule? Never use stabilizers to level your RV. They’re not designed to lift or shift the frame, and doing so can lead to bent jacks or twisted frames. Always level first—then stabilize.
Why Proper Stabilization Matters More Than You Think
If you’ve ever tried to sleep through a windy night in an unstable RV or cook while your stovetop wobbles beneath your pots, you already know how crucial stabilization is. But there’s more to it than just comfort. Inconsistent movement can wear down your trailer’s frame over time, especially if you have slide-outs or large steps that exert extra force when extended.
Appliances, particularly absorption refrigerators, need a level and stable surface to function properly. Misalignment can cause uneven cooling or, worse, permanent damage. Doors and drawers may swing open or slam shut unexpectedly, and the constant sway can be hard on your body and your nerves.
For RVers who travel with pets or small children, stabilization is even more important. A shifting rig can be unsettling or even hazardous for them. That’s why I recommend investing not only in leveling tools but also in a reliable combination of stabilizers tailored to your RV type.
Foundation First: Getting Your RV Perfectly Level
Before I explore the best stabilizer options, I need to address the foundation—because a stabilizer is only as good as the surface it’s sitting on. That means getting your RV level before anything else.
Leveling blocks are the go-to tools for side-to-side adjustments. Brands like Camco and Lynx make interlocking blocks that resemble oversized plastic Legos, designed to be stacked under your tires to raise one side of the RV. Most RVers find that having at least two 10-block sets on hand provides enough flexibility for uneven campsites.
Once the side-to-side leveling is done, front-to-back leveling can be handled using your RV’s tongue jack or built-in hydraulic system. It’s a good habit to use a bubble level on your RV floor or a digital leveling app to check for accuracy. Don’t forget to chock your wheels before you begin—this simple step can prevent rolling and help maintain your adjustments during setup.
Only once your RV is perfectly level should you deploy stabilizers. Attempting to stabilize an unlevel RV will not only be ineffective but can also damage your equipment.
Watch this video!
1. Use Heavy-Duty Scissor Jacks for All-Corner Stability
Let’s start with one of the most essential and affordable stabilizing tools out there: scissor jacks. These mechanical jacks are commonly found on travel trailers and fifth wheels, and for good reason—they’re reliable, easy to use, and can be deployed at all four corners of your RV.
When properly installed, scissor jacks help reduce the flex that causes rocking whenever someone walks inside your RV. But not all scissor jacks are created equal. Lightweight models that come pre-installed with many RVs may not offer the rigidity you need, especially if your rig is on the heavier side. Consider upgrading to a set of heavy-duty steel jacks rated for higher weight capacities (typically around 5,000 to 7,500 lbs).
To use them effectively, first ensure your RV is fully level. Then crank each jack down until it firmly contacts the ground or your stabilizer base pads. The goal is to eliminate the bounce—not to lift the RV. Over-tightening can damage the frame, so stop once you feel resistance and a solid connection with the ground.
Pairing your jacks with stabilizer pads or leveling blocks can help distribute weight evenly and prevent them from sinking into soft soil. Some RVers also swear by using cordless drill attachments for faster deployment—saving time and effort, especially in extreme weather.
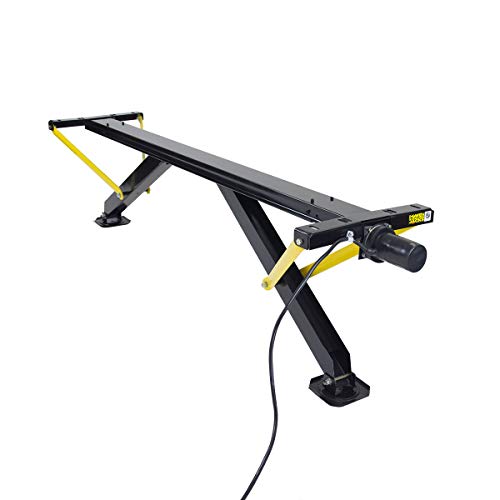
2. Add a Center Stabilizer Bar to Cut Frame Flex
If you’ve leveled and deployed your corner jacks but still feel motion when walking inside, your RV may be flexing at the frame’s midpoint. That’s where a center stabilizer bar can make a big difference.
Mid-frame movement is especially common in longer rigs or those with large slide-outs. A center stabilizer, typically installed beneath the main chassis or near the axles, connects the frame to the ground and cuts down on “bounce” in the living area—especially toward the middle of the floor where no other jacks are supporting the structure.
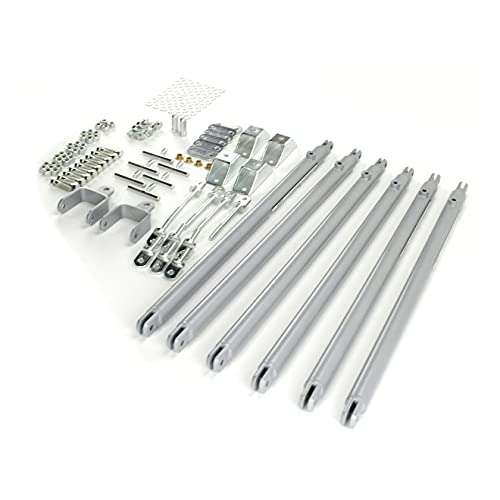
Popular options include BAL’s adjustable telescopic stabilizers or permanent aftermarket installations like the JT Strong Arm system. These are more advanced than scissor jacks and often require a bit of installation work, but they deliver noticeable results in reducing motion throughout the RV.
If you’re not ready for a permanent install, you can also try a universal stabilizer bar with a tripod-style base. While not as effective as chassis-mounted systems, they still help improve stability at a lower cost and effort.
3. Stabilize the Tongue Jack with a Tripod or Block Base
The tongue jack at the front of your travel trailer plays a critical role in keeping your rig level front to back. But it’s also a source of unwanted movement if left unsupported.
While most tongue jacks are designed to lift and lower the front of the trailer, they don’t do much to absorb side-to-side or back-and-forth motion. This is where a tongue jack stabilizer or tripod stand comes into play.
Tripod stabilizers attach beneath the tongue jack and create three solid points of contact with the ground, forming a triangle—the most stable geometric shape. This helps absorb shock from footsteps or swaying and significantly reduces the front-end bounce that many RVers complain about.
If you don’t want to carry a tripod stand, placing a wide stabilizer block under the jack can also help. Look for ones made of rubber or heavy-duty composite that won’t crack under pressure. Some blocks even come with built-in dampeners or pads to further reduce vibrations.
Adding this small piece of equipment can make a big difference in your RV’s overall stability, especially when combined with corner jacks and mid-frame supports.
4. Don’t Forget the Rear Bumper Area
Many RVers stabilize the front and sides of their rigs but forget about one major trouble spot: the rear bumper area. Because the rear end is often the farthest point from your jacks, even minor movement at the front can be amplified at the back.
To combat this, consider adding rear stabilizer arms or adjustable bumper jacks that mount directly near the frame’s back end. These can be particularly helpful in fifth wheels, which tend to shift more in the rear due to their longer wheelbase and rear living spaces.
Another effective solution is to place rubber stacker blocks or strong jack stands underneath the rear bumper. This setup not only reduces bounce when moving around the bedroom or rear bathroom, but also helps take stress off your suspension system by evenly distributing weight across more points of contact.
5. Always Use Wheel Chocks—But Upgrade to X-Chocks for Maximum Hold
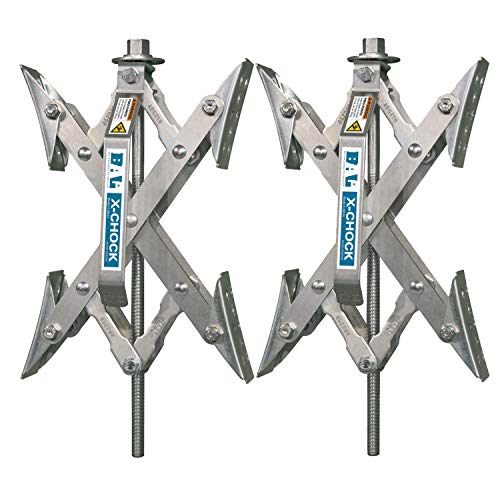
No matter how well your RV is stabilized, none of it matters if your wheels aren’t secured. Standard wedge-style wheel chocks are essential for safety and should always be used before leveling or stabilizing. But for added anti-rocking performance, X-Chocks are a serious upgrade.
X-Chocks fit between the tires of dual-axle RVs and expand outward to press firmly against each wheel. This tension reduces tire movement, limits frame flex, and creates a much firmer hold than standard chocks.
These chocks are especially useful for heavy fifth wheels and larger travel trailers. When properly installed and tightened with a wrench, they help eliminate a surprising amount of bounce—particularly when paired with a full stabilizing system.
Pro tip: use two sets—one on each side of the RV—to completely lock down your rig from the ground up.
Grab this 2-pack of X-shaped, drill-adjustable wheel chocks on Amazon for quick and reliable RV stability—perfect for your next camping trip!
Best RV Stabilizer Systems for Long-Term Stability
While portable and manual stabilizers work well for occasional campers or weekend travelers, full-time RVers or those staying in one place for extended periods often need a more heavy-duty approach. Let’s explore the top-performing integrated systems that offer long-lasting stability with minimal daily setup.
JT Strong Arm Stabilizer System
If you’re serious about eliminating movement from your RV, the JT Strong Arm system is often the go-to. This system works by attaching rigid steel bars between your stabilizing jacks and the RV frame, forming a triangle of support that resists both lateral and longitudinal motion.
Once installed, you won’t need to remove or adjust anything at each campsite—just tighten the T-handles, and you’re set. This system is ideal for travel trailers and fifth wheels alike and is especially effective when paired with scissor jacks or electric jacks.
Pros:
- Eliminates nearly all side-to-side and front-to-back movement.
- Permanently installed for quick setup at every stop.
- Custom-fit options for various trailer types and sizes.
Consideration:
Installation requires some drilling and basic mechanical knowledge. If you’re not handy with tools, professional installation might be the best route.
SteadyFast Stabilizer System
The SteadyFast system is a close competitor to the JT Strong Arm but differs slightly in design. Instead of triangulated arms from every corner, it uses a more centralized approach with rigid links and a tensioning mechanism.
This makes it more suitable for RVs with manual jacks, but a version is also available for powered jacks. It’s quick to engage and doesn’t require multiple connection points like some other stabilizers.
Advantages:
- Compatible with both manual and powered jacks (different kits available).
- Solid steel parts provide long-term durability.
- Minimal setup once installed.
Key Takeaway:
SteadyFast is ideal for RVers looking for an alternative to JT Strong Arm—especially if their rig is already fitted with manual jacks.
Recommended
Electric Stabilizing Systems: Convenience Meets Power
Electric RV stabilizers are game-changers in terms of ease. With a single push of a button, your stabilizer jacks lower into place and adjust automatically—even on uneven terrain.
One standout in this category is the Lippert Components Ground Control 3.0, which offers fully automated leveling and stabilization. While this goes beyond just stabilizing and into full auto-leveling, it’s a worthwhile investment for luxury campers or large fifth wheels.
Why Go Electric?
- Zero manual effort—great for older RVers or those with mobility issues.
- Precision in uneven camping spots.
- Integration with smartphone apps in newer models.
Downside:
- Higher upfront cost.
- Requires professional installation.
- May draw from your RV’s battery if solar or shore power isn’t available.

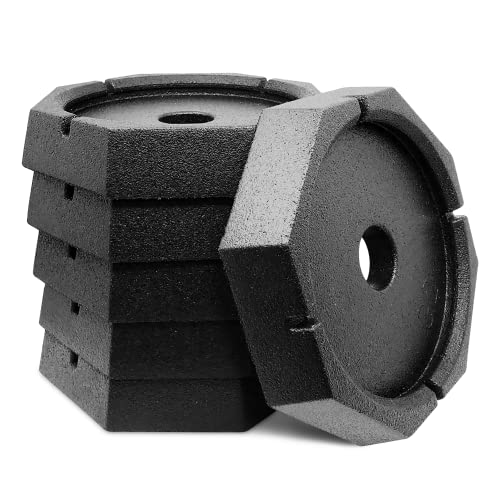
SnapPads: The Underrated Upgrade
SnapPads are permanent rubber shoes that attach to the metal feet of your stabilizing jacks. At first glance, they might seem like a simple add-on, but their value becomes clear on uneven or slippery terrain.
They provide:
- Increased surface area to distribute weight.
- Better grip on gravel, dirt, or asphalt.
- Noise dampening—no more metal-on-rock screech when you set up.
SnapPads are compatible with most jack types, and there are options for 9”, 10”, or 12” round feet and even octagon or square models.
Who Needs These?
Anyone who camps regularly on uneven or unpaved sites will benefit, especially boondockers and dry campers.
Choosing Between Systems: What’s Right for You?
To decide between these options, consider:
- Frequency of Use: Occasional weekenders can stick with manual tools, but full-timers benefit from permanent systems.
- RV Type: Fifth wheels benefit most from tripod and pin box stabilizers, while travel trailers often see success with JT Strong Arm or SteadyFast.
- Budget: Basic solutions like scissor jacks and SnapPads are cost-effective, while electric systems require deeper pockets.
Slide‑Out Stabilizers: Guarding One of Your RV’s Weakest Links
Slide‑outs can add massive floor‑space, but they also introduce a cantilevered load that magnifies sway. Every time someone walks near the extended section, weight shifts outward, flexing walls and floors. A quality slide‑out stabilizer supports the rail channel, keeps gears in alignment, and reduces lateral shake in the main cabin.
Most retail options resemble mini jack‑stands with wide, U‑shaped tops. Position each stand under the slide rail (never beneath the floor itself), raise it until it just kisses the frame, then give a quarter‑turn to preload the support. Over‑cranking can bend slide mechanisms, so snug—not tight—is the rule.
| Popular Model | Height Range | Max Load/Stand | Best For | Stand‑Out Feature |
|---|---|---|---|---|
| Valterra 020106 | 19″–47″ | 5,000 lb | Tall fifth‑wheel slides | Oversize footpad for sand |
| Camco Olympian | 16″–28″ | 6,000 lb | Mid‑height travel trailers | Quick‑release pin adjustment |
| Ultra‑Fab Telescopic | 42″–50″ | 5,000 lb | Heavy residential slides | Built‑in bubble level |
Manufacturer caveat: Some RV brands void slide warranties if auxiliary supports are used. Check your owner’s manual before installation; in doubtful cases stick to weight‑distributing pads under the factory landing feet instead of aftermarket stands.
Entry‑Step Supports: Small Add‑On, Big Difference
Entry stairs act as a lever that yanks on your chassis with every climb. Over months of touring, those repeated jolts loosen fasteners and amplify interior rocking. A simple step stabilizer—an adjustable pedestal that sits directly under the bottom tread—absorbs that force before it travels into the frame.
- Extend your stairs.
- Center the stabilizer beneath the bottom step.
- Twist the collar until the rubber cap contacts the tread, then add one additional half‑turn.
For rigs with “Lippert Solid Step” or MORryde fold‑down stairs, you can skip the pedestal and deploy the integrated adjustable feet; just be sure they sit flat on firm ground. On soft dirt or gravel, place a 12‑inch square of plywood under each foot to spread the load.
Terrain‑Tuned Stabilization Strategies
A pad that works on concrete might sink like a stone in spring mud. Match your footing to the campsite:
| Campsite Surface | Ideal Base Pad | Bonus Tip |
|---|---|---|
| Poured concrete or asphalt | Hard rubber SnapPads or aluminum jack shoes | Place a thin rubber mat between metal and pavement to mute rattles. |
| Packed gravel | 10″ × 10″ composite blocks with mild tread | Brush loose gravel away first for flush contact. |
| Forest dirt / grass | 12″ × 12″ heavy‑duty plastic stackers | Top with a silicone‑grid anti‑skid mat to prevent creeping during rain. |
| Beach sand or soft soil | 16″ round “elephant foot” pads or plywood squares | Wet the sand lightly before setting pads; moisture stiffens the top layer. |
| Snow or ice | Wide, textured poly pads plus a sprinkle of coarse road salt | Salt prevents the jack feet from glazing over with ice overnight. |
Wind‑Proofing and Long‑Stay Bracing
If you’ll be parked for weeks—or boondocking in gusty desert basins—add cross‑bracing straps between opposite stabilizer legs. A simple ratchet strap run in an “X” pattern under the chassis limits torsional sway that even strong arms can’t tame. Couple that with X‑Chocks between tandem wheels, and you’ll feel less motion during 30 mph wind bursts than many folks feel in a city apartment.
For coastal or mountain zones where wind direction shifts, stake mini ground anchors at 45‑degree angles from the stabilizer feet and secure them with nylon webbing. This low‑cost hack mimics the hurricane tie‑downs used on park models.
Recommended
Dampening Interior Vibrations
Once the exterior is locked down, treat residual tremors at their source:
- Rubber cabinet bumpers on doors and drawers end midnight rattles.
- High‑density EVA foam floor tiles under area rugs absorb footfall shock.
- Soft‑close hinges on pantry doors prevent slam‑induced reverberations.
These micro‑upgrades don’t replace good stabilization, but they do create a luxury‑quiet interior vibe—especially appreciated on rainy days when everyone’s pacing inside.
Stabilizer Maintenance: Protecting Your Setup for the Long Haul

Photo Credit: @boundlessbronnekes
Even the best stabilization setup will underperform if neglected. Dirt buildup, rust, or bent parts can compromise your entire system. Regular preventive care ensures your RV stays solid and shake-free.
Monthly Maintenance Checklist
Before each extended trip or monthly during long stays, inspect your stabilizing gear using this simple routine:
- Visual Inspection
Look for signs of bending, cracking, or excessive rust on jack legs, stabilizer stands, and base pads. Replace damaged parts immediately. - Lubrication
Spray moving parts (screw threads, pivot points) with a dry lubricant like silicone or graphite. Avoid greasy sprays that attract dirt. - Tightness Check
Ensure all mounting bolts and clamp screws are snug. Vibration from travel can loosen them over time. - Pad Surface Cleaning
Wipe off mud, sap, or gravel from pads to prevent slippage and uneven footing. - Storage Condition
If you’re packing stabilizers between campsites, keep them in a moisture-free bin with dividers to avoid rattling and rusting.
Seasonal Tasks
- Touch-Up Paint
Use rust-resistant enamel on exposed steel parts to prolong life and improve appearance. - Winterization
For off-season storage, remove and store portable stabilizers indoors. Spray protective oil over any exposed screw threads.
Final Thoughts: Stabilize Smart, Travel Smooth
Proper stabilization is more than a comfort upgrade—it’s structural insurance. Wobble-free camping protects your RV frame, appliances, and your sanity. Whether you’re parked in a breezy canyon, on rocky desert soil, or a paved campsite, the right setup ensures you sleep soundly and walk steadily.
Here’s a quick stabilization plan to guide your gear choices:
| Travel Style | Must-Have Tools | Nice-to-Have Additions |
|---|---|---|
| Weekend warrior | Integrated stabilizer jacks + rubber pads | Step stabilizer, small cross braces |
| Full-time RVers | Heavy-duty slide‑out stands, wide base pads | X-Chocks, wind straps, EVA foam tiles |
| Off-grid boondockers | Stackable jack blocks, anchor-ready bases | Ground anchors, extra plywood pads |
| Coastal campers | Rustproof gear, sand-friendly pads | Salt packs, ground tarp under rig |
Stabilization doesn’t have to be a guessing game. Build your system based on your rig’s weight, where you park, and how long you stay—and enjoy a rock-solid RV life wherever you roll.
🛠️ Pro Tip: Create a small “Stabilization Kit” bin in your storage bay. Include rubber gloves, levelers, pads, spare bolts, lubricant, and a mini checklist. It makes setup quicker, cleaner, and far less stressful at every campsite.